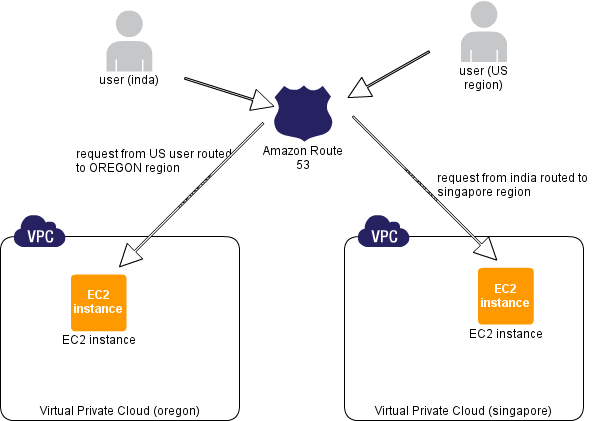
In this tutorial I will explain how to set up route53 dns service for two instances launched in different regions. Once instance in Oregon and other one in Singapore region.
I have two instances launched with same application in two different geographical regions. I want to route user traffic to the nearest server to reduce latency and increase performance. I can achieve this using rout53 dns service to route the user’s traffic based on the geographical information obtained from the ip address.
Getting started
1. Login to aws management console and open the route53 console.
2. Click create hosted zone option at the top left.
- Go to DNS settings of your domain name and click manage option under name servers. By default you will have two DNS endpoints. Deselect the standard option and select custom option in the manage section.
- Click add nameserver option and add the four rout53 DNS endpoint and hit save.
- Thats it. You are done with the settings in the domain name registrars side. Now, all you have to do is create record sets for the hosted zone. These record sets are used map the domain names to respective aws instances where you host your application.
6. I have two instances in two different aws regions. So i have to create seperate A records for different regions. Click create record set option , fill in the following details and create record set option.
- name : append www
- Type : A
- TTL :50
- Alias : yes , if you want to point the domain name to any load balcancer, s3 or cloud front enpoints. No, if you want to point the domain name to the servers ip. I my case, am selecting no because am pointing the domian name directly to the servers ip address.
- Value : ip address of your server which is hosting your application
- Routing Policy : latency
There are four routing policies, simple , latency, weighted and failover.
- Region : region where you have the instance.
- Set ID : description for the record (eg : oregon data center)
7. Create another A record set for singapore region and save the record set. So , you will have two record sets with same domain name pointing to different ip addresses with latency based routing policy.
The DNS and record sets updation will take a while. Once it it updated , the user requests will be routed based on the network latency. For example, if a user from US tries to access www.yourdomain.com, the request will be routed to oregon region since the network latency from US to singapore is more compared to oregon region. If a user from india tries to access www.yourdomain.com, the request will be routed to singapore region.


